Monday, March 21, 2011

Bargello - Lake Superior


Lake Superior
From “Instant Bargello”
by Susan Kisro
2008

Finished size – 36” x 50”

Fabrics:
Fabric 1 – 12” x 42” strip (about 1/2 yard)
Fabric 2 – 8 1/2” x 42” strip (about 1/3 yard)
Fabric 3 – 6 3/4” x 42” strip (about 1/4 yard)
Fabric 4 – 4” x 42” strip (about 1/4 yard)
Fabric 5 – 5” x 42” strip (about 1/4 yard)
Fabric 6 – 12” x 42” strip (about 1/2 yard)
Fabric 7 – 12” x 42” strip (about 1/2 yard)

Backing - 1 2/3 yard
Binding – (need 5 - 3 1/2 “ wide strips) 1/2 yard


Notes: for a baby quilt, leave bottom fabric off, and cut wide strips. The more strips are cut the narrower the quilt is. Perhaps even leave two fabrics off and then add a border.

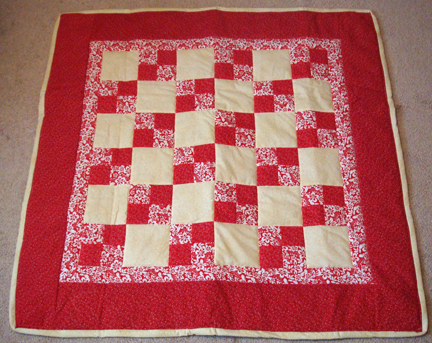
Four Patch Baby - 2


PATTERN:
Four Patch
From “Quilts for Baby: Easy as ABC”
by Ursula Reikes
1993

FABRIC:
Fabric A & First Border: leftover from Ivey quilt

Fabric B & Second Border: leftover from Ivey quilt

Block B & Binding: leftover from Northwoods quilt

Backing: Red cotton from Jo Ann Craft’s


BATTING: Polyester

DETAILS: straight quilted

Completed – March 2011


Monday, March 7, 2011

Four Patch Baby - 1


PATTERN:
Four Patch
From “Quilts for Baby: Easy as ABC”
by Ursula Reikes
1993

FABRIC:
Fabric A & First Border: leftover from Ivey quilt

Fabric B & Second Border: leftover from Ivey quilt

Block B & Binding: leftover from Northwoods quilt

Backing: leftover from a costume project


BATTING: Polyester

DETAILS: Free motion quilted

Completed – March 2011


Saturday, March 5, 2011

Four Patch Quilt


Four Patch
From “Quilts for Baby: Easy as ABC”
by Ursula Reikes
1993

Fabrics for Crib size:
Need 3 coordinating fabrics
Fabric A: 1/4 yard (3- 21/2” strips)
Fabric B: 1/4 yard (3- 21/2” strips)
Fabric C: 3/8 yard (2- 41/2” strips)

Inner Border – 3/8 yard (4- 21/2” strips)
Outer Border – 7/8 yard (4- 51/2” strips)
Binding – 3/8 yard (4- 21/2” strips)
Backing = 11/4 yard

** Fat quarters can be enough, with extra work. Good use for leftover fabric.

Tuesday, February 15, 2011

Maroon Handmaiden Costume

The Queens Handmaidens wear a dark red cloak in Episode I and Episode III. In stark contrast to the Queens elaborate and formal outfits, these cloaks are quite simple.
Episode I
Episode III (Padme's Funerial)


It is not know what is worn underneath the cloak (beyond a dark dress), so the outfit we see Rabe wearing in Episode I is generally assumed to be used under the cloak, since this costume is not seen anywhere else in the three pre-trilogy movies.
Episode I (Padme's Apartment on Coruscant)


Measurements – you will need good measurements of yourself to get a proper fit. Have a friend measure you. And keep those handy for the costume making process.

Pattern – if you are not an experienced seamstress, it would be helpful to start with a commercial pattern. Cloaks and simple dresses are almost always available commercially, especially around Halloween, and in the Historical or Costume pattern sections. Be sure to check the measurements on the back of the package, and pick the size that will best fit you.

Example - This pattern has all the basic requirements; and with just a few alterations, will be screen accurate.
 

Fabric – Red Cloak
Screen accurate reproductions need to be made from silk velvet. An expensive fabric, but worth the money in look and feel of the costume. And is easily found in many shades of dark red. Be sure to purchase a silk/rayon blend, as that is what is required for etching the Naboo symbols.


Fabric – Inner Hood & Scarf
It’s unknown what was used in the movie costumes, so a good suiting, taffeta, silk, or brocade fabrics will work well for these pieces. Since these pieces are small, not much fabric is needed or even seen.

Fabric – Under dress
It’s unknown what was used in the movie costumes, so a good silk, polyester, linen, suiting, or velvet will work well for the dress. Worn under the red robe, not much of this will really be seen.


Getting started – I suggest purchasing a sample of the velvet you intend to use for the cloak, and practicing the etching on that. You’ll be able to see how the fabric reacts to the etching and get practice doing the etching technique.

A how-to on etching velvet can be found here: http://thelavenderstudio.blogspot.com/2011/01/velvet-etching

Beyond that - this a simple cloak, it can be done with out making a mock-up. Be sure to use your personal measurements and compare those to the actual pattern. Remember to take into account seam allowances and whatever you will wear under the cloak. The cloak is a bit oversized; so being a little big or a little long is just fine. And wash and iron your fabrics.

You may need to make your hoods longer and wider, so they are just as full as the movie costume. The “inner scarf” can be a simple long narrow piece attached to your inner hood, wrapped around your neck, and secured in the back. 

Finished Costume
 

Saturday, January 29, 2011

Velvet Etching


Stencil:
You’ll need your design as a stencil. Stencil plastic can be found at local supercenters and craft/hobby stores. Generally you can purchase 8x10” sheets in small packs for around two dollars. Draw your design on paper, lay the stencil plastic over top of your drawing, and trace it with a thin marker. Then cut the design out with a craft knife.

Completed stencil


Fiber Etch gel:
Fiber Etch is a liquid gel which comes ready to use for devore' or "burnout" processes*.
*Cotton, linen, and rayon yarns ("plant" fibers) are completely removed with Fiber Etch. With blended fabrics, the synthetic, silk, or wool yarns which remain after etching leave decorative effects, appearing almost as if they were woven into the fabric.

You’ll need to purchase some Fiber Etch, it can be found thru online stores.

Fabric and prep:
The Fiber Etch works wonderful on Silk/Rayon blend of velvet. If you’re feeling unsure of everything, purchase a sample of your chosen fabric and practice on it.

You need to wash, dry, and press your velvet. This washes out sizing on the fabric and gets any shrinking done.

Etching:
You’ll need to decide where you’re going to do the etching. Cutting out your pattern and using copies of your stencil can help you lay everything out.

When you have your placement decided, tape down your stencil and apply the etching liquid. Use a small squeeze bottle to fill your stencil in with the Fiber Etch. (Small squeeze bottles can be found in the cake decorating section at most supercenters.) Painting on with a brush can also be done, but does take extra time to apply a heavy enough coat of Fiber Etch. The stencil can be gently picked up, wiped clean, and moved to another location, to allow you to etch several places in one sitting.

Remove your stencil and let the Fiber Etch sit for at least one (1) hour and not more that 24 hours. After at least one hour, use a heavy duty hairdryer to begin drying the etching gel. Be sure to get the fiber etch completely dry.

Then iron from the backside of the fabric. Set your iron to silk or wool, so you don't burn the fabric. On the front side the pile of the velvet will get hard and flake away with your fingers. Take your time and keep the iron moving slowly so you don't burn it. When all the areas have become hard, its time to wash.

Put your fabric under warm water, in a clean sink, and gently rub it with your fingers.
Most of the fibers will wash away. If needed, use a small brush (one made to clean your fingernails) to rub a little harder. Be very gentle with the fabric, the silk can tear easy! Rinse the fabric, squeeze any extra water out, and then let dry. Rolling it in a bath towel can help remove excess water, then let hang or lay flat to completely dry.

If there are any areas that didn't wash away, pick the fibers off with a pair of tweezers. Just take your time and have good light, being careful not the snag the silk! Having the fabric damp makes it easier to pull out. Use the tweezers to take away exactly what you want, making the symbol perfect.

Completed etching.


Friday, January 14, 2011

Ceremonial Leia Dress

This is for the dress Princess Leia wears when she presents Luke and Han their medals at the end of “A New Hope”. The dress is a floor length A-line dress, lined, and has a short train at the back. The ‘sleeves’ are open and fall to the floor, often being referred to as “wings”. And this is a good costume for plus size women.


Measurements 
You will need good measurements of yourself to get a proper fit. Have a friend measure you. And keep those handy for the dress making process.

Pattern 
If you are not an experienced seamstress, it would be helpful to start with a commercial pattern. The ideal one will have an empire waist seam (a seam just under the bust), round neckline, and no sleeves. No pattern will be perfect, so choose one that is as close as you can get. Be sure to check the measurements on the back of the package, and pick the size that will best fit you.

Example - This pattern has all the basic requirements; and with just a few alterations, will be screen accurate.


Fabric 
Beyond being white, the fabric needs to be a bit sheer (enough to see your hand under one layer), have a soft, flowing hand, and be washable as you are sure to get dirt on it as you wear it. One excellent fabric is the JetSet Poly typically used for the Senatorial Gown. But other fabrics such as swimsuit lining also make good fabrics for this costume.

Getting started – making a pattern and mock-up
You can make a copy of your pattern by laying tissue paper over the pattern, then tracing the pattern onto the tissue. This will give you a copy you can cut and alter as needed. Not only will you need to alter the pattern to fit you, but you’ll need to include a side zipper (on the wearers left side), you may need to add a train, lower the neckline, thin the shoulder straps, add/adjust darts for fitting, alter the bust seam, etc… this is why a copy is very handy, so you will always have your original pattern to go back to.

When your ready… cut a practice dress out, use an inexpensive fabric like muslin. Sew it together, and try it on. 


Use an inexpensive fabric for a mock-up first.

Specific Alterations

Bodice Front - Darts
You will probably need darts on the bottom layer in the front to help the dress fit to you. Be sure to include these in your practice dress, and alter as needed. These will be on the top layer and your lining layer. The ‘wings’ pieces will go over these and hide them.


Bodice Back - Darts
You will probably need darts in the back to help the dress fit to you. Be sure to include these in your practice dress, and alter as needed. These will be on the top layer and your lining layer.


Bodice Front - The ‘inverted V’ seam
This isn’t really a fold in the front bodice, but the place where the two bodice pieces meet, and the edge of the top layer creates this ‘seam’. You can accomplish this by shaping your bodice/wing piece to go beyond the center front, on an angle, and fold under at the edge. You’ll first stitch down the bodice/wing piece, fold it over, then sew it into the neckline on the top and the skirt on the bottom.

(click to enlarge)


The ‘wings’ - Front
For the shape at the bottom of the wing... it will be straight from the side seams down to about your knee. That is where the “flutter” part starts. (Letter A) The “flutter” part ends at the bottom of the wing, which should be the same length as your finished dress. (Letter B)


The ‘wings’ - Back
On the back, the ‘wings’ will go over your shoulder, and fall straight down to the hem of your dress.  


They will cover your shoulder, but not go across your back.  


And are left unstitched in the back. You can tell that when Leia reaches forward and part of her shoulder is exposed. (If you do have very round shoulders, and you find that your sleeves are always falling forward on you, you can hide a few hand stitches on the back of your shoulder to keep everything in place. Just be sure you can still reach forward with out the fabric pulling.)


A finished “wing” piece should look something like this:

(click to enlarge)


Facings –
You will need to make facings for the neckline, armholes, and hems. These are basically a 2 inch wide (2” unfinished, about 1.5” finished) piece of fabric used to finish the edges of the neckline, armholes, and the bottom hem. You can re-trace your neckline/arm holes/hems onto tissue and use a ruler to make matching curves 2 inches away from the first marks. The ‘inside edge’ will match to your dress, while the ‘outside edge’ will need to be finished off and tacked down. This will give all your edges a nice, clean, and comfortable finish.

The train -
Is a nice rounded sweep to the bottom of the skirt back. The longest part will be at the center back, and sweeping up to the side seam. 


Fitting –
Have a friend experienced in fitting garments fit your mock-up to you. This is the time to work on everything to get the fit and the alterations just right. You don’t want any surprises once you use your final fabric!

The real deal!
Once you have your mock-up completely adjusted, take it apart and use it as a pattern to cut out your final fabric. And assemble this way...


Sew the darts in the front and back pieces of the bodice. Baste together your lining and top pieces along the neckline, bust seam, and side seams. This will make it easier to handle them as one piece.


Lay the wing pieces on top of your bodice front, and use a dress makers pencil to mark where you need to stitch. Allowing for turning under the raw edge. Do this for both wings. 


Starting with the left wing, sew down the wing. Remember to place the wing with right sides of the fabric together, and that you’re going to fold the piece over the stitching.


Fold the wing over and baste along the neckline and bottom bust seam. Remember not to sew along the bust seam all the way to the side seam at the edge. You’ll need to leave ⅝ inch unattached so you can sew the side seam later.


Then repeat with the right wing.


Fold the wing over and baste down the neckline and bust seam.

      
Now you can add the skirt; join the front to the back; put in your neck and armhole facings. Remember, before finishing, you’ll need to do a little hand stitching at the side seams. Simply fold up about ⅝ inch of the wing and stitch it at the side seam on each side. (They are not stitched anywhere around the armhole.)


To finish off the costume, you’ll need to make a hairpiece (or use your own), necklace, bracelet, belt, and shoes.  


Written by Deidra Culp, Beret Balestrieri Kohn and Beth Thornton.
Illistrations by Deidra Culp and Beret Balestrieri Kohn.
Making-of photos by Beth Thornton.